


# 特殊行为-拆墙
温馨提示:开始阅读这篇指南之前,我们希望你对《我的世界》基岩版附加包有一定了解,有能力撰写 JSON 数据格式,对 Python 进行模组开发有了解,并能够独立阅读《我的世界》开发者官网-开发指南或其他技术引用文档。
本文将修改原版僵尸的行为,实现一个可以拆除墙体的僵尸。
在本教程中,您将学习以下内容。
- ✅自定义生物行为的实现;
- ✅拆墙行为的实现;
请点击这里 (opens new window)下载本章节课程的教学包
# 如何检测被墙体阻隔
想要实体在被墙体阻隔时,仍然保留对目标的仇恨的话,首先第一步就需要改造一下攻击目标选择的组件:
"minecraft:behavior.nearest_attackable_target": {
    "priority": 2,
    "must_see": false, // 如果 Ture,那么目标实体必须在视线范围内
把 must_see 组件改为 false,这样,就可以在被墙体阻隔的情况下仍然被实体所选择:

下一个问题就到了如何检测被墙体阻隔了。
我们检查和查阅所有的组件也好,Molang 变量也好,发现并没有能够直接使用的,我们只能曲线救国了。
# break_blocks组件
我们查阅组件列表发现有一个 eat_blocks 组件 (opens new window),但是实际测试之后并不能使用,原因就是因为这个组件是模拟山羊用来吃掉脚下方块的组件,想要达到拆墙的效果并不可行,效果演示:
另外还发现了一个 break_blocks 组件 (opens new window),这可能是一个符合要求的选择,但是如果只是单纯加入,就会表现得横冲直撞(即使在没有目标时):
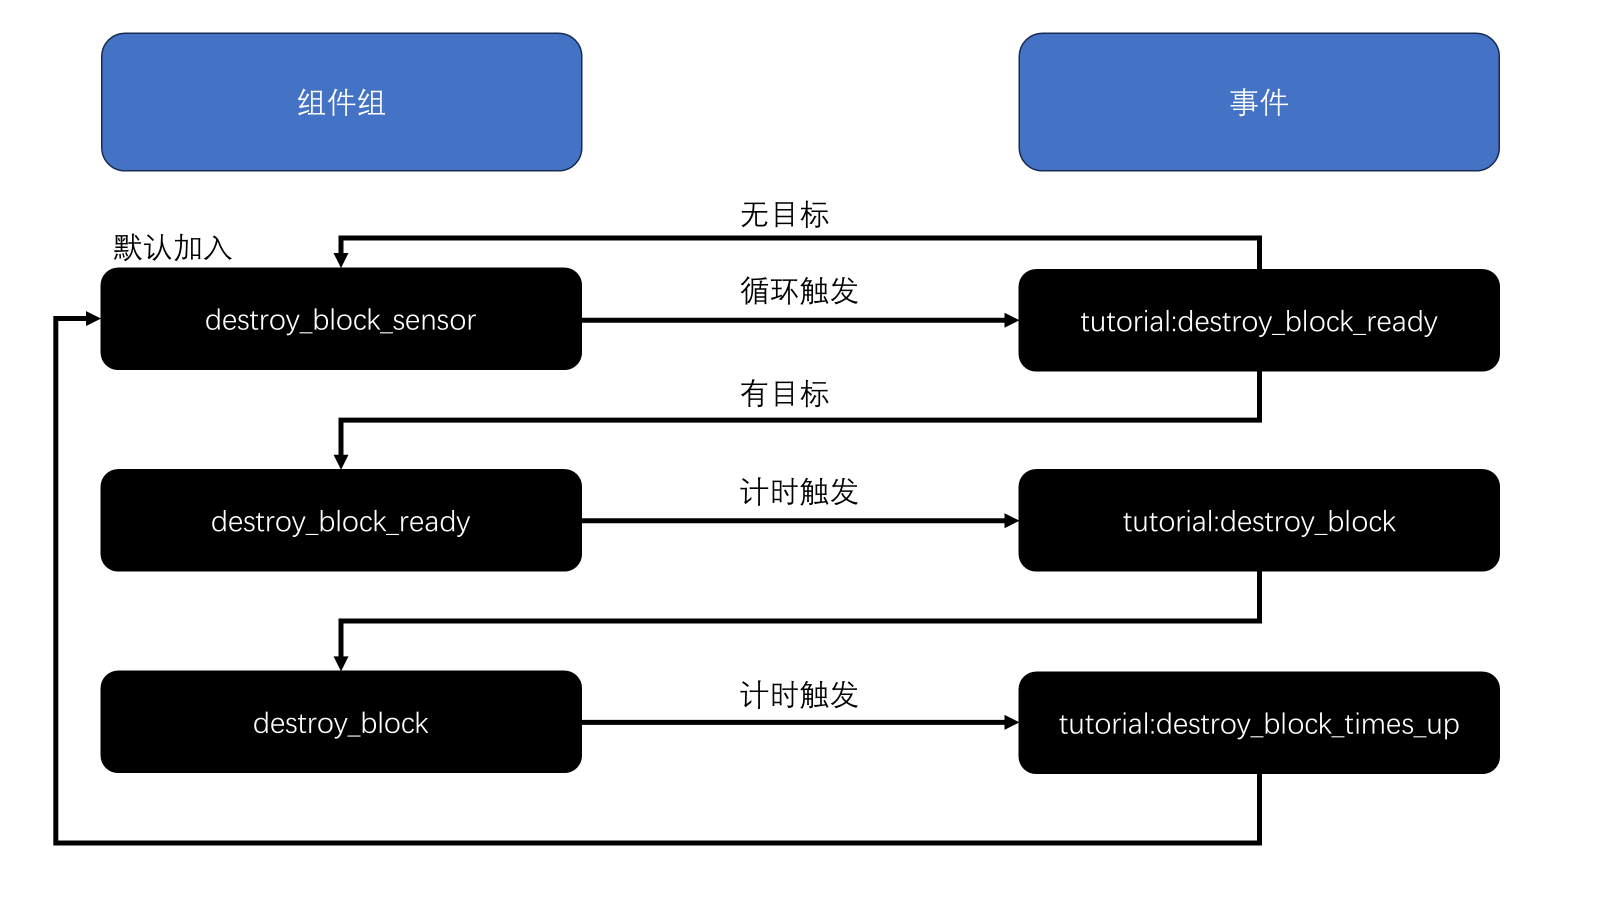
我们想要他在发现目标之后再进行一个短暂的破坏(也就是说需要冷却),我们可以使用上节课说到的传感器和 Timer 组件来配合使用:
{
    // 省略了其他无关信息
    "minecraft:entity": {
        "component_groups": {
            "destroy_block_sensor": {
                // 这里不能使用传感器,是因为如果当加入传感器时已经有了目标时,就无法触发事件了
                // 所以之类我们改成了使用 Timer 来 Tick 检测的方式
                "minecraft:timer": {
                    "looping": true,
                    "randomInterval": true,
                    "time": [1, 1.5],
                    "time_down_event": {
                        "event": "tutorial:destroy_block_ready"
                    }
                }
            },
            "destroy_block_ready": {
                "minecraft:timer": {
                    "looping": false,
                    "randomInterval": true,
                    "time": [1, 1.5],
                    "time_down_event": {
                        "event": "tutorial:destroy_block"
                    }
                }
            },
            "destroy_block": {
                "minecraft:break_blocks": {
                    "breakable_blocks": [
                        "stone",
                        "glass"
                    ]
                },
                "minecraft:timer": {
                    "looping": true,
                    "randomInterval": true,
                    // 给一个足够短的时间,让它只能破坏一堵墙
                    "time": [0.2, 0.2],
                    "time_down_event": {
                        "event": "tutorial:destroy_block_times_up"
                    }
                }
            }
        },
        "events": {
            // 自定义事件
            "tutorial:destroy_block_ready": {
                // 如果有目标的话,则加入 "destroy_block_ready" 组件组,否则就继续执行 Timer
                "filters": {
                    "test": "has_target"
                },
                "add": {
                    "component_groups": ["destroy_block_ready"]
                },
                "remove": {
                    "component_groups": ["destroy_block_sensor"]
                }

            },
            "tutorial:destroy_block": {
                "add": {
                    "component_groups": ["destroy_block"]
                },
                "remove": {
                    "component_groups": ["destroy_block_ready"]
                }
            },
            "tutorial:destroy_block_times_up": {
                "add": {
                    "component_groups": ["destroy_block_sensor"]
                },
                "remove": {
                    "component_groups": ["destroy_block"]
                }
            }
        }
    }
}
看上去有点长,但实际上这个流程还是很清晰的:
我们加入游戏之后测试:
可以看到,虽然也能达到类似效果,但是这个 break_blocks 组件是机械暴力的拆掉路径上的所有方块,并没有检测的功能。
# 动画控制器+Molang
还记得我们上节课提到过一个 query.walk_distance 的 Molang 变量,它会返回实体当前行走的总长度。
如果说一个实体在有目标的情况下长时间没有移动(总路程没变),是不是也可以侧面说明实体被“墙体”挡住了?
理论存在,开始实践。首先添加上控制器:
{
    "format_version": "1.10.0",
    "animation_controllers": {
        // 破坏墙体
        "controller.animation.zombie.destroy_wall": {
            "initial_state": "default",
            "states": {
                "default": {
                    "on_entry": [
                        "/say start wall check...",
                        // 刚开始检测时的初始距离
                        "v.start_distance = query.walk_distance;",
                        // 需要检测的时间,游戏一帧是 20 帧,这里 x * 20 就是 x 秒
                        "v.time2check = query.time_stamp + 1 * 20;"
                    ],
                    "transitions": [
                        {
                            // 移动的距离足够短并且时间到了 tick 时间,条件满足则开始破坏方块
                            "start_destroy_block": "query.walk_distance - v.start_distance < 1 && query.time_stamp >= v.time2check"
                        },
                        {
                            // 不满足条件则进入冷却重新进入检测
                            "cooldown": "query.walk_distance - v.start_distance >= 1 && query.time_stamp >= v.time2check"
                        }
                    ]
                },
                "start_destroy_block": {
                    "on_entry": [
                        "/say start destroy wall",
                        // 需要检测的时间,游戏一帧是 20 帧,这里 x * 20 就是 x 秒
                        "v.time2check = query.time_stamp + 0.1 * 20;",
                        "@s tutorial:destroy_block"
                    ],
                    "on_exit": [
                        "/say finished destroy wall",
                        "@s tutorial:destroy_block_finished"
                    ],
                    "transitions": [
                        {
                            "cooldown": "query.time_stamp >= v.time2check"
                        }
                    ]
                },
                "cooldown": {
                    "on_entry": [
                        "/say destroy wall in cooling",
                        // 需要检测的时间,游戏一帧是 20 帧,这里 x * 20 就是 x 秒
                        "v.time2cooldown = query.time_stamp + 1 * 20;"
                    ],
                    "transitions": [
                        {
                            "default": "query.time_stamp >= v.time2cooldown"
                        }
                    ]
                }
            }
        }
    }
}
此时的 zombie.json 如下:
{
    "format_version": "1.16.0",
    "minecraft:entity": {
        "description": {
            // ...省略基础定义...
            "animations": {
                "destroy_block_sensor": "controller.animation.zombie.destroy_wall"
            },
            "scripts": {
                "animate": [
                    {
                        // 只有在有目标的情况下才执行控制器的逻辑
                        "destroy_block_sensor": "query.has_target"
                    }
                ]
            }
        },
        "component_groups": {
            "destroy_block": {
                "minecraft:break_blocks": {
                    "breakable_blocks": [
                        "stone",
                        "glass"
                    ]
                }
            },
            // ...省略 baby/ adult 和 walk 行为组
        },
        "components": {
            // ...省略组件...
        },
        "events": {
			// ...省略出生事件...
            // 自定义事件
            "tutorial:destroy_block": {
                "add": {
                    "component_groups": ["destroy_block"]
                }
            },
            "tutorial:destroy_block_finished": {
                "remove": {
                    "component_groups": ["destroy_block"]
                }
            }
        }
    }
}
这其实跟上面第一种方式的本质区别就是用更加灵活的 Molang 变量替代了死板的 Timer 组件。
这样做之后的区别就是,僵尸不会再一股脑的破坏掉路径上的所有方块,而是会在检测走不动时,才会开始尝试破坏方块:
这样虽然也是模拟了检测的情况,也尽最大可能还原了拆墙的行为逻辑,但是也不是真正意义上的检测。
我们会发现原版的组件和 Molang 变量似乎并不能真正满足需求了,如果我们想要实体行更好用,这时候就需要用到我们的自定义生物行为了。
# 自定义生物行为
如果对这个内容不熟悉的同学,请自行前往阅读官方文档 (opens new window)。
在最新的 2.9 版本中,getEntitiesOrBlockFromRay 接口 (opens new window)新增了对射线上方块获取的支持,这个 API 接口可以从指定位置发射一条射线,获取与射线相交的实体和方块信息。
我们可以以此为基础来创造一个使用最短路径破坏墙体来攻击目标的自定义僵尸,实现之后的演示如下:
完整代码示例如下:
# coding=utf-8
import mod.server.extraServerApi as serverApi
from mod.common.utils.mcmath import Vector3

CustomGoalCls = serverApi.GetCustomGoalCls()
CompFactory = serverApi.GetEngineCompFactory()


class DestroyWall(CustomGoalCls):
    def __init__(self, entityId, argsJson):
        super(DestroyWall, self).__init__(entityId, argsJson)
        self.mEntityId = entityId
        self.mTimeCounter = 0

    # region 继承函数
    def CanUse(self):
        if self._HasTarget() and self._IsTargetAlive() and self._HasBlockBetweenTargetAndCanDestroyBlock():
            return True
        return False

    def CanContinueToUse(self):
        return self.CanUse()

    def CanBeInterrupted(self):
        return True

    def Start(self):
        self.mTimeCounter = 0
        self._FaceToTarget()

    def Stop(self):
        pass

    def Tick(self):
        self.mTimeCounter += 1
        perSec = self.mTimeCounter % 20 == 0
        if perSec:
            # 限制僵尸 1s 只能破坏一个方块
            self._DestroyFrontBlock()

    # endregion

    # region 类函数
    def _HasTarget(self):
        #是否有仇恨目标
        comp = CompFactory.CreateAction(self.mEntityId)
        targetId = comp.GetAttackTarget()
        hasTarget = targetId != "-1"
        return hasTarget

    def _IsTargetAlive(self):
        comp = CompFactory.CreateAction(self.mEntityId)
        targetId = comp.GetAttackTarget()
        comp = CompFactory.CreateGame(serverApi.GetLevelId())
        alive = comp.IsEntityAlive(targetId)
        return alive

    # 跟目标之间是否存在方块并且是否能够破坏
    def _HasBlockBetweenTargetAndCanDestroyBlock(self):
        blockDictList = self._GetFirstBlockFromRay()
        if len(blockDictList) == 0:
            return False
        blockDict = blockDictList[0]
        blockPos = blockDict['pos']
        selfPos = CompFactory.CreatePos(self.mEntityId).GetFootPos()
        distance2block = (Vector3(blockPos) - Vector3(selfPos)).Length()
        return distance2block < 2  # 2 是手长,也就是只有够得到的方块才能够被破坏

    # 面向目标
    def _FaceToTarget(self):
        comp = CompFactory.CreateAction(self.mEntityId)
        targetId = comp.GetAttackTarget()
        targetPosX, targetPosY, targetPosZ = CompFactory.CreatePos(targetId).GetFootPos()
        entityPosX, entityPosY, entityPosZ = CompFactory.CreatePos(self.mEntityId).GetFootPos()
        diffPos = (targetPosX - entityPosX, targetPosY - entityPosY, targetPosZ - entityPosZ)
        CompFactory.CreateRot(self.mEntityId).SetRot(serverApi.GetRotFromDir(diffPos))

    # 破坏生物面前的方块
    def _DestroyFrontBlock(self):
        blockDictList = self._GetFirstBlockFromRay()
        if blockDictList:
            blockDict = blockDictList[0]
            blockPos = blockDict['pos']
            blockInfoComp = CompFactory.CreateBlockInfo(self.mEntityId)
            dimensionId = CompFactory.CreateDimension(self.mEntityId).GetEntityDimensionId()
            blockInfoComp.SetBlockNew(blockPos, {'name': 'minecraft:air'}, 0, dimensionId)

    # 获得视线范围内第一个方块信息
    def _GetFirstBlockFromRay(self):
        dimensionId = CompFactory.CreateDimension(self.mEntityId).GetEntityDimensionId()
        comp = CompFactory.CreateAction(self.mEntityId)
        targetId = comp.GetAttackTarget()
        targetPosX, targetPosY, targetPosZ = CompFactory.CreatePos(targetId).GetFootPos()
        entityPosX, entityPosY, entityPosZ = CompFactory.CreatePos(self.mEntityId).GetFootPos()

        # 这里获取碰撞箱的高度,因为 FootPos 是从脚底开始计算的坐标,这里加上碰撞箱 -0.2 模拟的是头部眼睛的高度
        _, collisionBoxHeight = CompFactory.CreateCollisionBox(self.mEntityId).GetSize()
        _, targetCollisionBoxHeight = CompFactory.CreateCollisionBox(targetId).GetSize()

        targetPosY = targetPosY + targetCollisionBoxHeight - 0.2
        entityPosY = entityPosY + collisionBoxHeight - 0.2

        rot = (targetPosX - entityPosX, targetPosY - entityPosY, targetPosZ - entityPosZ)
        distance = int(Vector3(rot).Length() - 1)   # 这个地方用小数会非常卡,所以取一个 int,主要是防止射线击穿实体

        blockDictList = serverApi.getEntitiesOrBlockFromRay(
            dimensionId, (entityPosX, entityPosY, entityPosZ), rot, distance, False,
            serverApi.GetMinecraftEnum().RayFilterType.OnlyBlocks
        )

        return blockDictList

    # endregion
此时的 zombie.json 文件如下:
// ...省略其他无关信息...
"component_groups": {
    "destroy_block": {
        "minecraft:behavior.python_custom:destroy_wall": {
            "priority": 1,
            "module_path": "destroyWallScripts.destroyWall",
            "class_name": "DestroyWall",
            "control_flags": ["move"]
        }
    },
# 破坏时间的支持
上面的方块破坏是无差别破坏路径上的所有方块,连基岩也逃不过,这明显是不合理的。
我们可以通过配置配合 GetDestroyTotalTime 接口 (opens new window)来限制自定义实体能够破坏方块的种类。我们稍微改造一下 _HasBlockBetweenTargetAndCanDestroyBlock 函数:
# 跟目标之间是否存在方块并且是否能够破坏
def _HasBlockBetweenTargetAndCanDestroyBlock(self):
    blockDictList = self._GetFirstBlockFromRay()
    if len(blockDictList) == 0:
        return False
    blockDict = blockDictList[0]
    blockPos = blockDict['pos']
    selfPos = CompFactory.CreatePos(self.mEntityId).GetFootPos()
    distance2block = (Vector3(blockPos) - Vector3(selfPos)).Length()
    if distance2block > 2:
        # 2 是手长,也就是只有够得到的方块才能够被破坏
        return False
    # 还需要检测手上的物品是否能够破坏掉方块
    destroyTotalTime = self._GetTargetBlockDestroyTime(blockDict['identifier'])
    canDestroy = destroyTotalTime > 0
    return canDestroy

def _GetTargetBlockDestroyTime(self, blockIdentifier):
    blockInfoComp = CompFactory.CreateBlockInfo(self.mEntityId)
    carriedItem = CompFactory.CreateItem(self.mEntityId).GetEntityItem(serverApi.GetMinecraftEnum().ItemPosType.CARRIED, 0)
    totalTime = blockInfoComp.GetDestroyTotalTime(blockIdentifier, None if not carriedItem else carriedItem['itemName'])
    return totalTime
并且我们新增对破坏时间的支持,也就是说,实体真的需要这么多时间来破坏方块:
# coding=utf-8
import mod.server.extraServerApi as serverApi
from mod.common.utils.mcmath import Vector3

CustomGoalCls = serverApi.GetCustomGoalCls()
CompFactory = serverApi.GetEngineCompFactory()

# 省略了其他无关的函数...
class DestroyWall(CustomGoalCls):
    def __init__(self, entityId, argsJson):
        super(DestroyWall, self).__init__(entityId, argsJson)
        self.mEntityId = entityId
        self.mTimeCounter = 0
        self.mTargetBlockDestroyTime = 0  # 目标方块破坏时间

    def Start(self):
        self.mTimeCounter = 0
        self._FaceToTarget()
        self._ResetDestroyTime()  # 开始执行时设置目标方块破坏时间

    def Tick(self):
        self.mTimeCounter += 1
        time2destroy = self.mTimeCounter >= int(self.mTargetBlockDestroyTime * 20)  # 1 秒 20 帧
        perSec = self.mTimeCounter % 20 == 0
        if time2destroy:
            self._DestroyFrontBlock()
            self._ResetDestroyTime()
        elif perSec:
            # 使用 /say 命令来监控实体当前的状态
            leftTime = self.mTargetBlockDestroyTime - self.mTimeCounter / 20.0
            CompFactory.CreateCommand(self.mEntityId).SetCommand('/say 正在破坏方块,还剩:{}s'.format(leftTime))

    def _ResetDestroyTime(self):
        blockDict = self._GetFirstBlockFromRay()[0]
        self.mTargetBlockDestroyTime = self._GetTargetBlockDestroyTime(blockDict['identifier'])
        # 使用 /say 命令在游戏中输出破坏时间
        CompFactory.CreateCommand(self.mEntityId).SetCommand('/say 破坏时间:{}s'.format(self.mTargetBlockDestroyTime))
一番改造之后,可以进入游戏查看效果:
# 动画支持
可以看到,虽然支持了破坏时间,但是并没有破坏的动画,显得非常呆板。我们尝试给正在破坏方块的实体加入一个破坏方块的动画。
如果是我们自定义的实体,可以很方便的使用自定义的 query.mod.xxx 或者直接使用播放动画的接口来实现播放自己动画的效果。
但我们这里使用的是原版资源,原版是通过 variable.attack_time 来实现的攻击动画,查看原版的动画文件也是使用的 Molang 来实现:
"animation.humanoid.attack.rotations.v1.0" : {
    "loop" : true,
    "bones" : {
        "body" : {
            "rotation" : [ 0.0, "(math.sin(math.sqrt(variable.attack_time) * 360) * 11.46) - this", 0.0 ]
        },
        "leftarm" : {
            "rotation" : [ "(math.sin(math.sqrt(variable.attack_time) * 360) * 11.46)", 0.0, 0.0 ]
        },
        "rightarm" : {
            "rotation" : [ "math.sin(1.0 - math.pow(1.0 - variable.attack_time, 3.0) * 180.0) * (variable.is_brandishing_spear ? -1.0 : 1.0 )", "variable.is_brandishing_spear ? 0.0 : (math.sin(math.sqrt(variable.attack_time) * 360) * 11.46) * 2.0", 0.0 ]
        }
    }
},
而 variable.attack_time 我们无法更改。所以我们只能曲线救国了。
虽然不能触发原版的攻击动画,但是可以用玩家的 swim 动画来代替(模拟有动画的情况),最终效果如下:
怎么实现的呢?首先我们需要把动画加入到实体之中去,为了不破坏原版文件,我们使用代码的方式无侵入式的加入玩家的有用动画:
# -*- coding: utf-8 -*-
import mod.client.extraClientApi as clientApi

CompFactory = clientApi.GetEngineCompFactory()


class CustomEntityClientSystem(clientApi.GetClientSystemCls()):

    def __init__(self, namespace, name):
        super(CustomEntityClientSystem, self).__init__(namespace, name)
        self.ListenEvent()

    def ListenEvent(self):
        self.ListenForEvent(clientApi.GetEngineNamespace(), clientApi.GetEngineSystemName(), "OnLocalPlayerStopLoading",
                            self, self.OnLocalPlayerStopLoading)
        self.ListenForEvent(clientApi.GetEngineNamespace(), clientApi.GetEngineSystemName(), "AddEntityClientEvent",
                            self, self.OnAddEntityClientEvent)

    def OnLocalPlayerStopLoading(self, args=None):
        gameComp = CompFactory.CreateGame(clientApi.GetLevelId())
        zombieEntityList = gameComp.GetEntitiesAroundByType(clientApi.GetLocalPlayerId(), 48,
                                                            clientApi.GetMinecraftEnum().EntityType.Zombie)
        for _entityId in zombieEntityList:
            # 这里考虑的存量的僵尸
            self.RegisterZombieAnimate(_entityId)

    def OnAddEntityClientEvent(self, args):
        entityId = args['id']
        engineTypeStr = args['engineTypeStr']
        # 这里是考虑的新增的僵尸
        if engineTypeStr == 'minecraft:zombie':
            self.RegisterZombieAnimate(entityId)

    def RegisterZombieAnimate(self, entityId=None):
        if entityId is None:
            entityId = clientApi.GetLevelId()
        actorRender = CompFactory.CreateActorRender(entityId)
        actorIdentifier = 'minecraft:zombie'
        actorRender.AddActorAnimation(actorIdentifier, "custom_attack", "animation.player.swim")
        actorRender.AddActorScriptAnimate(actorIdentifier, "custom_attack", "query.variant == 1.0")
        res = actorRender.RebuildActorRender(actorIdentifier)
        print '================RegisterZombieAnimate=========', res
我们需要给动画绑定一个条件,我们在第一课 实体基础 的时候了解过很多用于标识物体状态的组件,比如 minecraft:variant、minecraft:mark_variant、minecraft:skin_id 等,我们这里直接选择一个使用就行了。
对应的我们也需要在 zombie.json 加入组件和对应的事件:
{
    // 省略了其他无关内容
    "format_version": "1.16.0",
    "minecraft:entity": {
        "component_groups": {
            "destroy_block": {
                "minecraft:behavior.python_custom:destroy_wall": {
                    "priority": 1,
                    "module_path": "destroyWallScripts.destroyWall",
                    "class_name": "DestroyWall",
                    "control_flags": ["move"]
                }
            },
            "destroy_block_attack": {
                "minecraft:variant": {
                    "value": 1
                }
            },
            "destroy_block_attack_not_play": {
                "minecraft:variant": {
                    "value": 0
                }
            },
        },
        "events": {
            // 自定义事件
            "tutorial:destroy_block_attack": {
                "add": {
                    "component_groups": ["destroy_block_attack"]
                },
                "remove": {
                    "component_groups": ["destroy_block_attack_not_play"]
                }
            },
            "tutorial:cancel_destroy_block_attack": {
                "add": {
                    "component_groups": ["destroy_block_attack_not_play"]
                },
                "remove": {
                    "component_groups": ["destroy_block_attack"]
                }
            },
        }
    }
}
这里有一个细节是一旦我们加入了 minecraft:variant 这样用于标记的组件之后,除非我们主动改变数值,否则标记就会一直存在。所以我们这里还需要一个额外的 destroy_block_attack_not_play 组件组来控制。
然后在我们自定义行为开始和结束的时候,使用 API 对应触发事件就行了:
class DestroyWall(CustomGoalCls):

    def Start(self):
        # ...........
        self._TriggerEntityEvent("tutorial:destroy_block_attack")  # 设置超远距离的攻击

    def Stop(self):
        self._TriggerEntityEvent("tutorial:cancel_destroy_block_attack")  # 还原普通攻击

    def _TriggerEntityEvent(self, eventName):
        comp = CompFactory.CreateEntityEvent(self.mEntityId)
        comp.TriggerCustomEvent(self.mEntityId, eventName)
        # 使用 /say 命令输出打印
        CompFactory.CreateCommand(self.mEntityId).SetCommand('/say 触发自定义事件:{}'.format(eventName))
# 小结
我们这节课使用了原版组件、动画控制器以及自定义生物行为来实现我们的拆墙。会发现,其实实现生物行为的思路有很多,虽然网易给出的自定义行为能够突破微软组件的限制,但也是需要再足够了解 API 的情况下。
另外复杂的生物行为也可能会存在性能问题。这在后续自己实现生物行为的时会更了解到这一点。
# 课后作业
本次课后作业,内容如下:
- 尝试在
_b/entities新增一个zombie.json文件,修改原版僵尸的行为,使其具备拆墙的行为(多种方式); - 打开客户端的调试功能,观察并测试;