


# Spigot插件编写
# 语言基础
编写Spigot插件需要一定的Java语言基础,并在后续开发中会使用到Maven或Gradle来构建Spigot插件,在此仅提供部分链接供参考,需要开发者自行学习。
在掌握Java语言基础后,需要继续学习Spigot、BC的API并进行插件开发。同样也需要开发者自行进行学习。
# 开始编写Spigot插件
# 创建项目
本教程会使用IntelliJ IDEA来进行插件开发,并使用Minecraft Development插件来快速创建项目。
如果没有安装的可以提前进行安装

首先点击创建项目,找到Minecraft分类,选择Spigot插件。
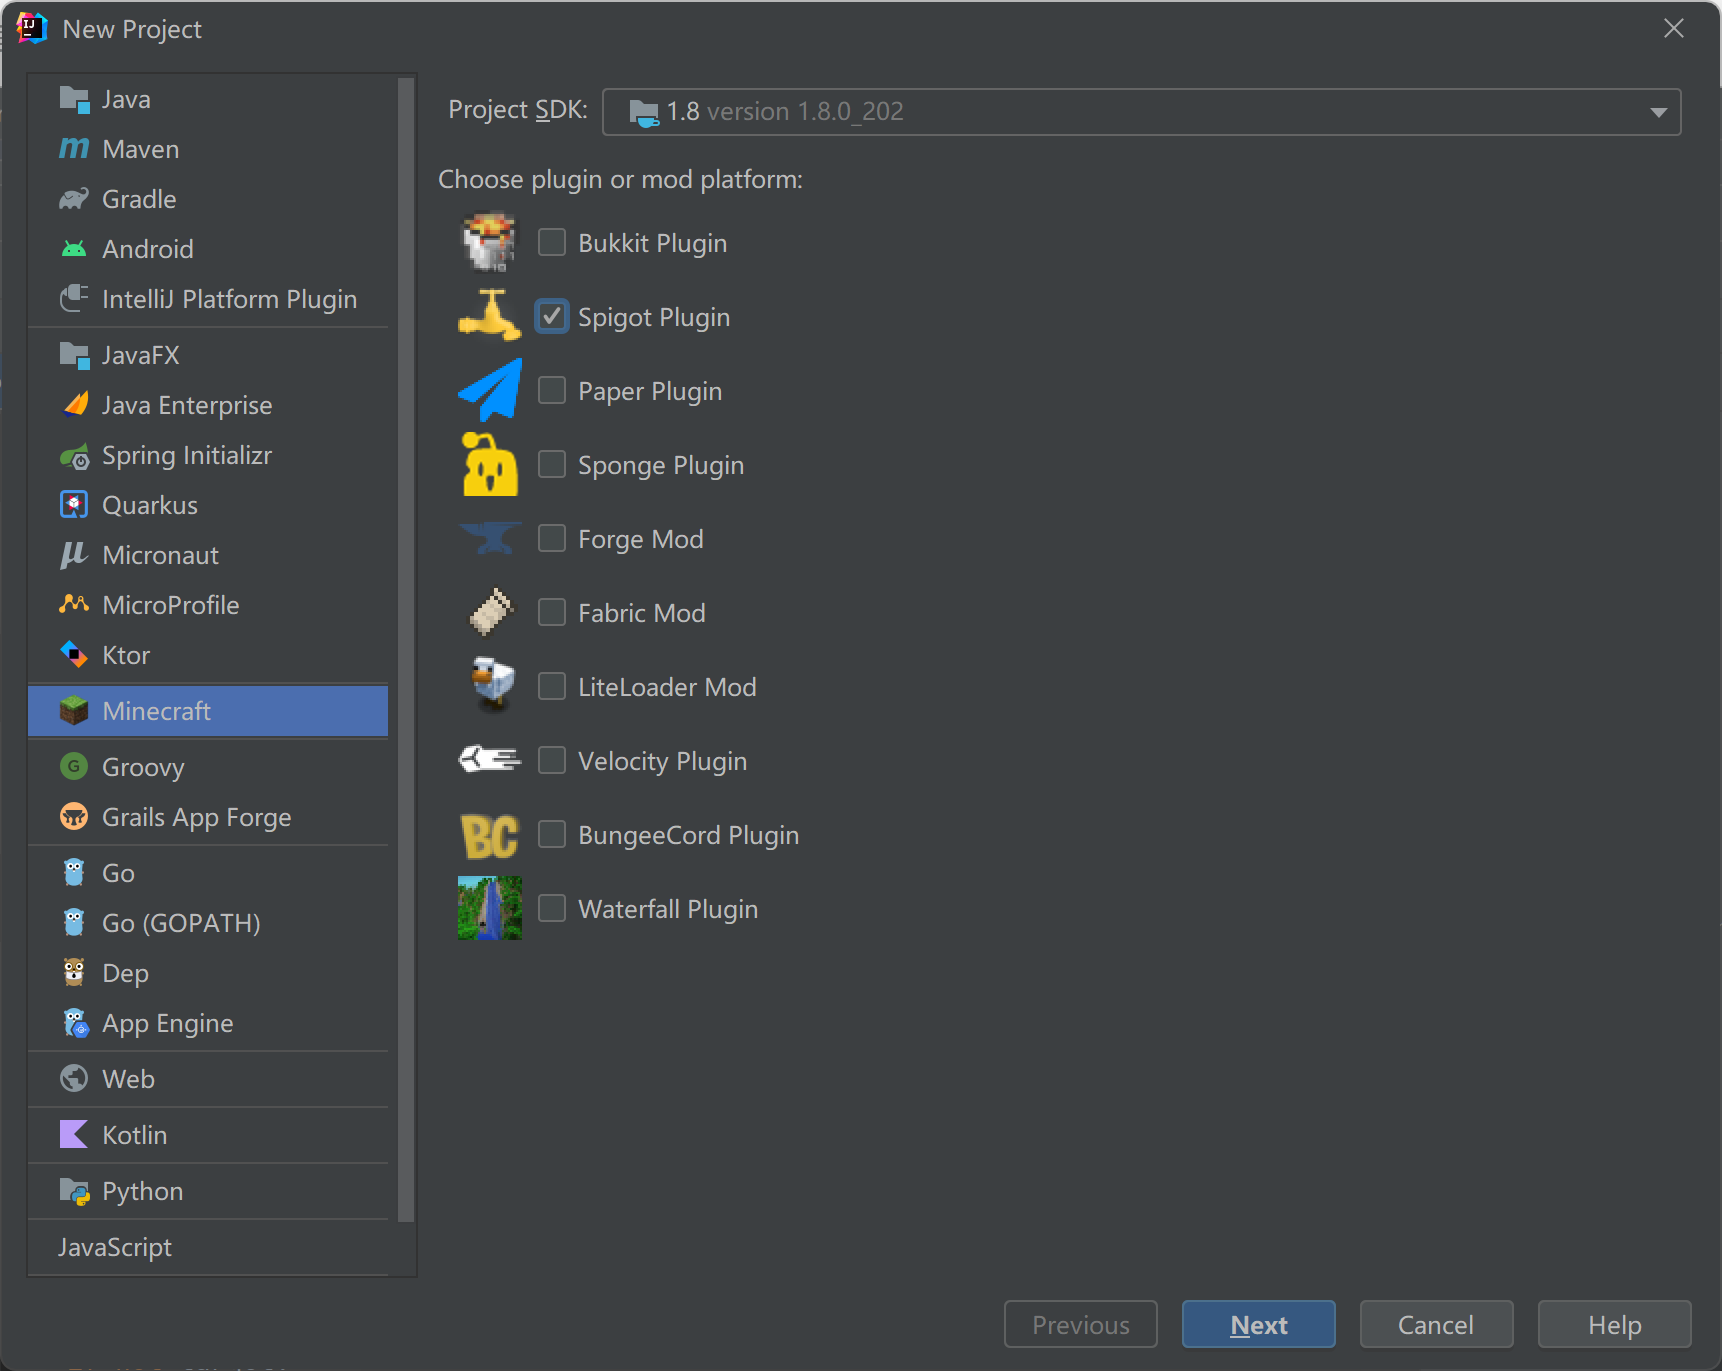
接着自行填写GroupId和ArtifactId,点击下一步后,进行如下更改:
- 选择Minecraft Version为1.12.2
- 填写Depend为SpigotMaster
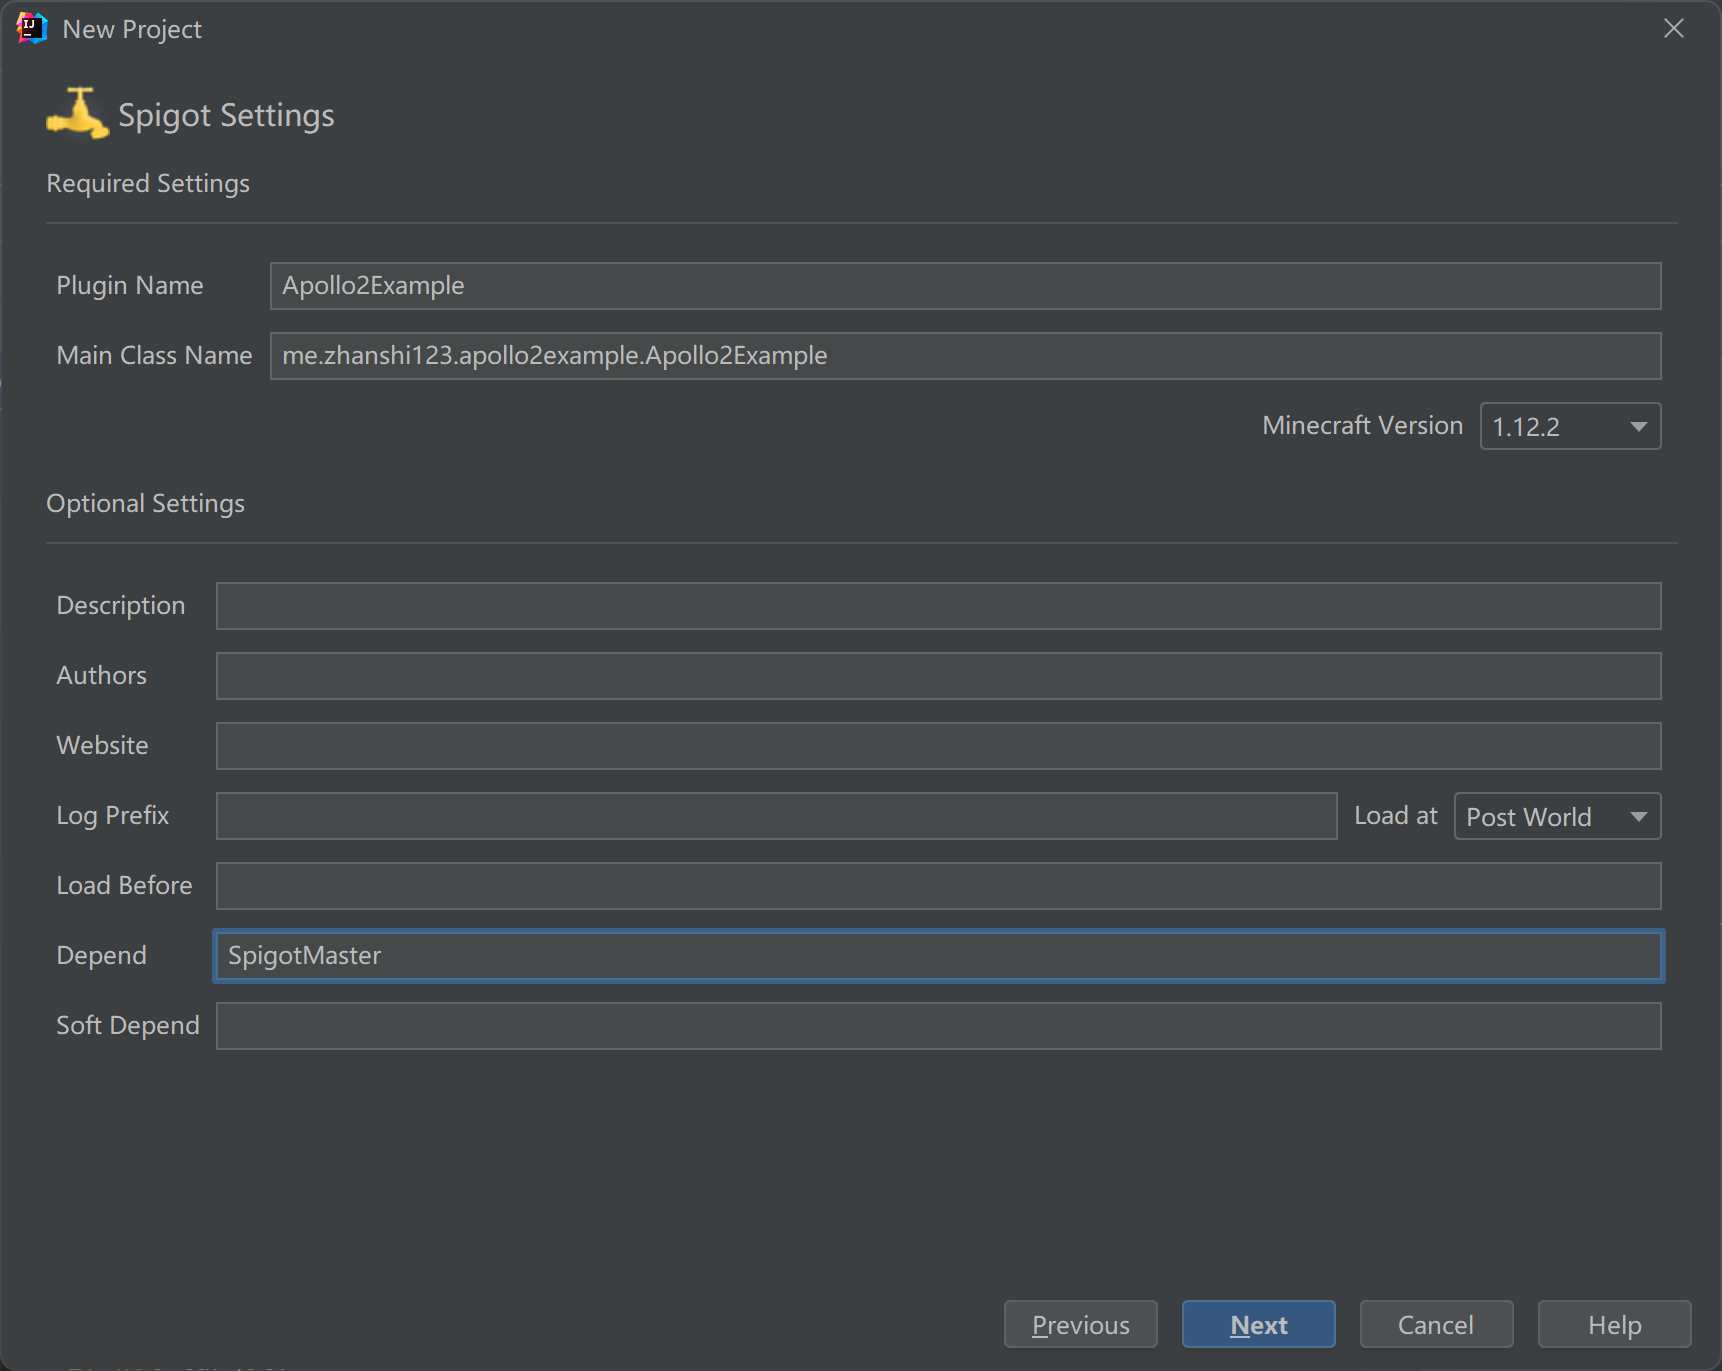
点击下一步后,选择目录和目录名进行项目创建。
# 添加依赖
在下载SpigotMaster插件后,复制文件路径。将下方指令中的path-to-jar替换为路径,x.x.x替换为版本号。
SpigotMaster插件和之前安装到服务器里的是同一个,可以点我 (opens new window)查看下载方式。
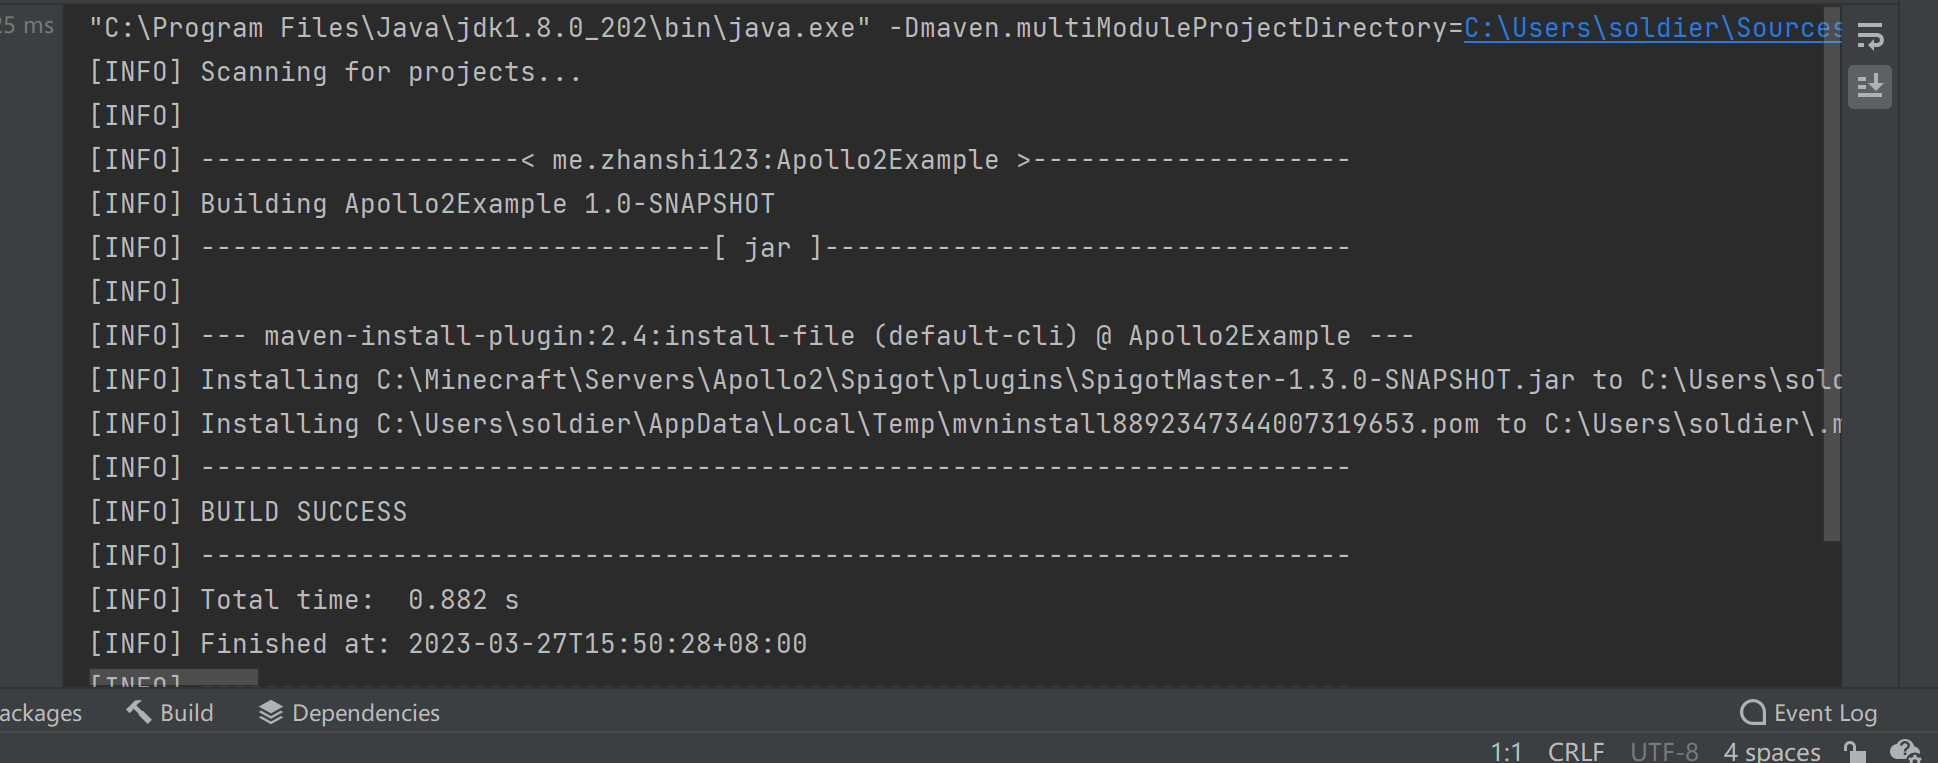
mvn install:install-file -Dfile=path-to-jar -DgroupId=com.neteasemc -DartifactId=SpigotMaster -Dversion=x.x.x-SNAPSHOT -Dpackaging=jar
在IDEA的Maven指令中执行
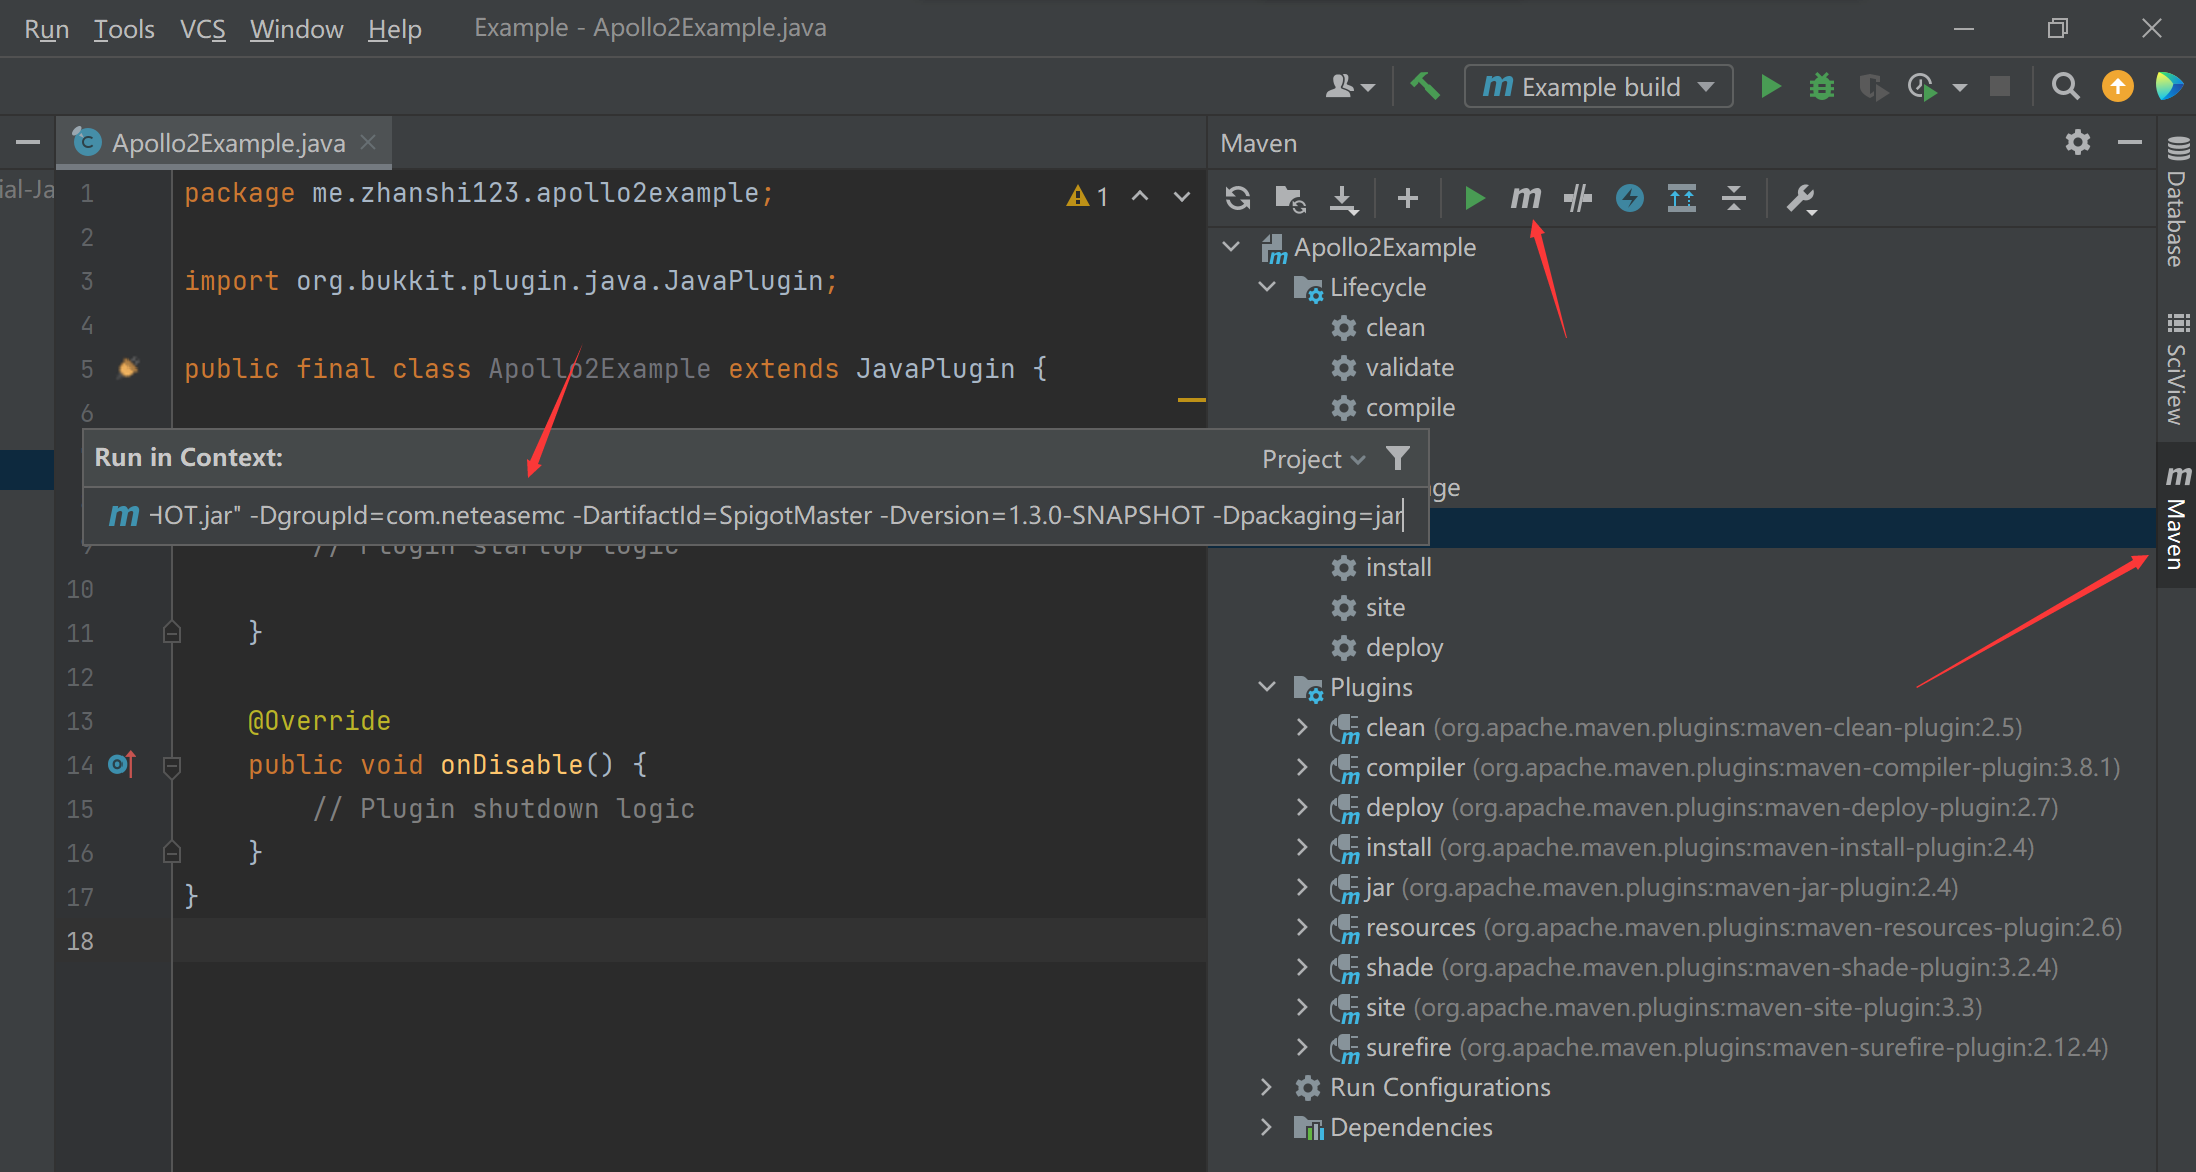
执行成功后,会看到BUILD SUCCESS的输出。
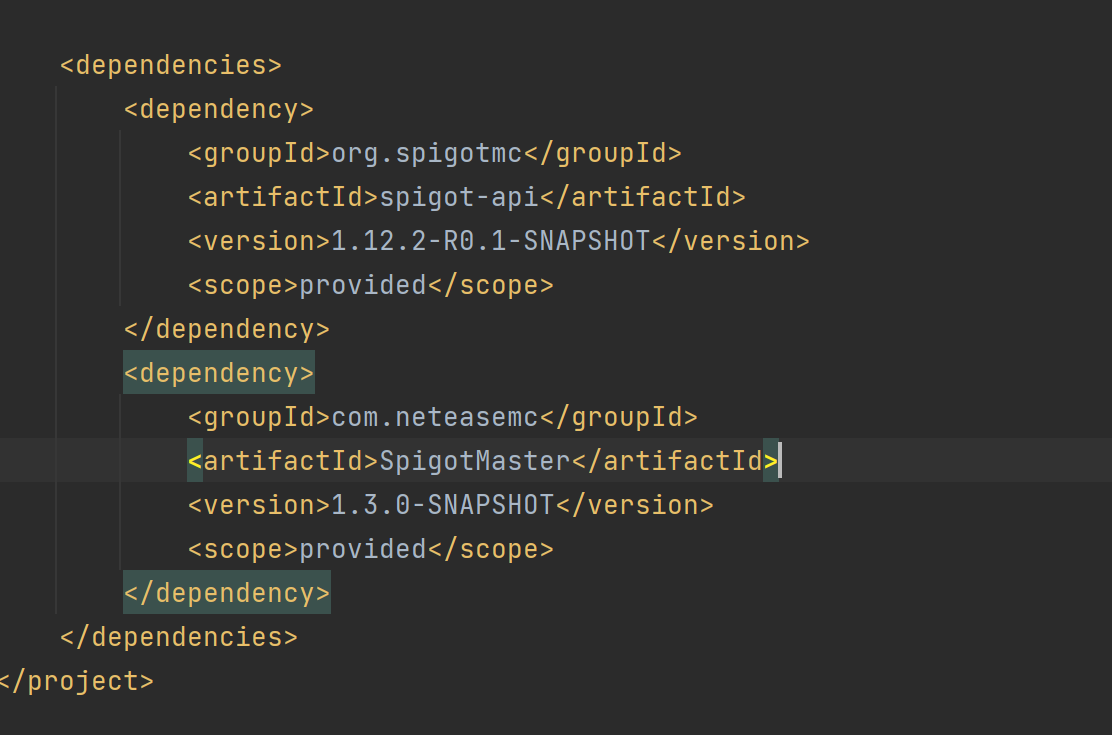
接下来在pom.xml中,配置dependency添加依赖。
		<dependency>
            <groupId>com.neteasemc</groupId>
            <artifactId>SpigotMaster</artifactId>
            <version>1.3.0-SNAPSHOT</version>
            <scope>provided</scope>
        </dependency>
其中版本处需要替换为自己安装的版本。添加完成后dependency如下。
# 代码编写
完成了依赖的添加,就可以使用SpigotMaster来和中国版基岩版客户端进行通信了。
在SpigotMaster的接口中,涉及到与客户端通信的方法主要有两个。
- listenForEvent
- notifyToClient
使用SpigotMaster实例下的这两个方法将可以实现绝大多数通信的需求。
其他方法可以参考:SpigotMaster文档 (opens new window)
SpigotMaster的实例可以通过下方代码获取。
public void onEnable() {
	SpigotMaster spigotMaster = (SpigotMaster) Bukkit.getPluginManager().getPlugin("SpigotMaster");
}
# listenForEvent
使用该方法可以监听客户端发送来的事件,需要提供参数:
namespace- 来源客户端系统的namespacesystem- 来源客户端系统的systemNameevent- 事件名handler- 回调函数
在这里我们先暂时编写一个简单的监听事件的函数。
package me.zhanshi123.apollo2example;

import com.neteasemc.spigotmaster.SpigotMaster;
import org.bukkit.Bukkit;
import org.bukkit.plugin.java.JavaPlugin;

public final class Apollo2Example extends JavaPlugin {
    private static Apollo2Example instance;

    public static Apollo2Example getInstance() {
        return instance;
    }

    private SpigotMaster spigotMaster;

    public SpigotMaster getSpigotMaster() {
        return spigotMaster;
    }

    @Override
    public void onEnable() {
        instance=this;
        spigotMaster = (SpigotMaster) Bukkit.getPluginManager().getPlugin("SpigotMaster");
        spigotMaster.listenForEvent("testMod", "testModBeh", "TestEvent", (player, map) -> {
            getLogger().info(player.getName());
            map.forEach((key, value) -> getLogger().info("k: " + key + "v: " + value));
        });

    }

    @Override
    public void onDisable() {
        // Plugin shutdown logic
    }
}
调用这个方法,将会注册一个命名空间为testMod,系统名为testModBeh的TestEvent事件,并在收到数据时打印发送的玩家名,和事件的信息字典。
Java的listenForEvent的回调函数,会在Python端调用NotifyToServer时触发。对应的代码如下:
self.NotifyToServer("TestEvent", {"data": "测试数据"})
在ClientSystem内调用NotifyToServer方法,传递事件和对应参数。完整的Python代码见下一节。
# notifyToClient
该方法可以主动给客户端发送事件,需要提供参数:
player- 接收事件的玩家namespace- 在客户端系统使用ListenForEvent监听的namespacesystem- 在客户端系统使用ListenForEvent监听的systemNameevent- 事件名data- 事件参数。注意,要使用-2指代本地玩家的entityId。
我们同样编写一个指令,用来后续测试Python端是否能正常收到消息
首先在plugin.yml中注册指令
commands:
  apollotest:
接下来新建一个类,实现CommandExecutor接口,在玩家执行指令时调用SpigotMaster实例并notifyToClient
package me.zhanshi123.apollo2example;

import org.bukkit.command.Command;
import org.bukkit.command.CommandExecutor;
import org.bukkit.command.CommandSender;
import org.bukkit.entity.Player;

import java.util.HashMap;
import java.util.Map;

public class Commands implements CommandExecutor {
    @Override
    public boolean onCommand(CommandSender sender, Command command, String label, String[] args) {
        if (!(sender instanceof Player)) {
            return true;
        }
        Player player = (Player) sender;
        Map<String, Object> data = new HashMap<>();
        data.put("msg", "这是一条来自Java服的消息");
        Apollo2Example.getInstance().getSpigotMaster()
                .notifyToClient(player, "testMod", "testModDev", "TestServerEvent", data);
        player.sendMessage("notifyToClient已执行");
        return true;
    }
}
在这里,我们将作为testMod这个命名空间的testModDev的系统,发送事件,事件名为TestServerEvent,数据为一个Map,它会在客户端被读取为Python的字典类型进行处理,其中的数据也会被转换为Python类型:
| Java类型 | Python类型 |
|---|---|
| null | None |
| boolean | bool |
| int | int |
| long | long |
| BigInteger(2^63到2^64-1) | long |
| float | float |
| double | float |
| String | str |
| List<Object> | list |
| Map<String, Object> | dict |
对于Python端,需要接受来自Java端的notifyToClient发送的数据,需要调用ClientSystem的ListenForEvent方法,对应的代码如下:
这样就会在收到事件时,打印参数。完整的Python代码见下一节。
    def __init__(self, namespace, systemName):
        ClientSystem.__init__(self, namespace, systemName)
        self.ListenForEvent(ModConst.ModName, ModConst.ServerSystemName, "TestServerEvent", self, self.OnServerEvent)

    def OnServerEvent(self, args):
        print "OnServerEvent", args

    def Destroy(self):
        self.UnListenForEvent(ModConst.ModName, ModConst.ServerSystemName, "TestServerEvent", self, self.OnServerEvent)
接下来在onEnable方法中进行注册。
Bukkit.getPluginCommand("apollotest").setExecutor(new Commands());
随后执行mvn package即可对插件进行打包,随后可以上传至小小云对应Spigot端的plugins文件夹。
然后重启服务器,即可让插件加载。