# 自定义农作物
# 概述
开发者可以通过以下两种方式实现自定义农作物,详见demo CustomCropMod
1)通过netease:transform组件定义农作物之间的转换规则;
2)通过python脚本监听 ServerItemUseOnEvent 、 BlockRandomTickServerEvent 、 BlockNeighborChangedServerEvent 等事件控制方式。
# 公共组件说明
# base_block设置
- 自定义农作物方块的base_block需要设为custom_crop_block
# netease:transform
该组件用于自定义农作物方块之间的转换
| 键 | 类型 | 默认值 | 解释 |
|---|---|---|---|
| conditions | dict | 农作物方块转换的条件,三个条件同时满足时会转化为result方块 | |
| result | str | 农作物方块转换后的方块名称 |
例如:
 "netease:transform": {
     "conditions": {
         "brightness": { # 农作物生长必须满足的光照条件
             "max": 15,
             "min": 9
         },
         "random_tick_count": { # 转化需要经过的随机tick次数
             "value": 2  # 2表示在第三次随机tick时转化,不允许小于等于0的值
         },
         "surrouding": { # 转化需要的周围方块
             "value": "minecraft:sand",
             "radius": 1 # 半径
         }
     },
     "result": "minecraft:egg" # 转化为哪种方块
 }
# minecraft:seed
自定义种子,详见minecraft:seed
# 自定义农作物方式一
该方式适用于纯配置json,不需要写任何python脚本逻辑。
这种方式包括一个种子(自定义物品)与三种自定义农作物的状态(自定义方块)。
# 1)自定义种子
参照自定义基础物品,自定义一个农作物种子customcrop:custom_wheat_seeds。
{
  "format_version": "1.10",
  "minecraft:item": {
    "description": {
      "identifier": "customcrop:custom_wheat_seeds",
	    "category": "Nature"
    },
    "components": {
      "minecraft:seed": {
        "crop_result": "customcrop:customcrop_stage0",# 种子生成的方块
        "plant_at": "minecraft:sand" #种植条件
      }
    }
  }
}
json说明:
该种子的标识为customcrop:custom_wheat_seeds,它包含一个minecraft:seed组件,其中
| 字段 | 值 | 说明 |
|---|---|---|
| crop_result | customcrop:customcrop_stage0 | 种子将生长为customcrop:customcrop_stage0自定义方块 |
| plant_at | minecraft:sand | 该种子只能在“沙子”上种植,种植后其所有的生长状态的下方方块也必须为“沙子”,如果底部的方块被破坏,农作物也将被破坏 |
# 2)自定义三种农作物状态
参照自定义方块,我们将自定义三种农作物状态,分别为:customcrop:customcrop_stage0、customcrop:customcrop_stage1、customcrop:customcrop_stage2,其中部分json如下所示:
# customcrop:customcrop_stage0
{
  "format_version": "1.10.0",
  "minecraft:block": {
    "description": {
      "identifier": "customcrop:customcrop_stage0",
      "base_block": "custom_crop_block"
    },
    "components": {
      ...
      "netease:transform": {
        "conditions": {
          "brightness": { # 光照条件
            "max": 15,
            "min": 9
          },
          "random_tick_count": { # 随机tick次数条件
            "value": 1
          },
          "surrouding": { # 在半径为1的周围需要存在“沙子”
            "value": "minecraft:sand",
            "radius": 1
          }
        },
        "result": "customcrop:customcrop_stage1" # 成长下一阶段的方块
      },
      ...
    }
  }
}
# customcrop:customcrop_stage1
{
  "format_version": "1.10.0",
  "minecraft:block": {
    "description": {
      "identifier": "customcrop:customcrop_stage1",
      "base_block": "custom_crop_block"
    },
    "components": {
      ...
      "netease:transform": {
        "conditions": {
          "brightness": {
            "max": 15,
            "min": 9
          },
          "random_tick_count": {
            "value": 1
          },
          "surrouding": {
            "value": "minecraft:sand",
            "radius": 1
          }
        },
        "result": "customcrop:customcrop_stage2" # 成长下一阶段的方块
      },
      ...
    }
  }
}
# customcrop:customcrop_stage2
{
  "format_version": "1.10.0",
  "minecraft:block": {
   "description": {
      "identifier": "customcrop:customcrop_stage2",
      "base_block": "custom_crop_block"
    },
    "components": {
      ...
      "minecraft:loot": {
        "table": "loot_tables/blocks/customcrop_stage2.json"
      }
      ...
    }
  }
}
该阶段为农作物的成熟阶段,可以通过minecraft:loot的方式获得收获。
# 3)成长过程

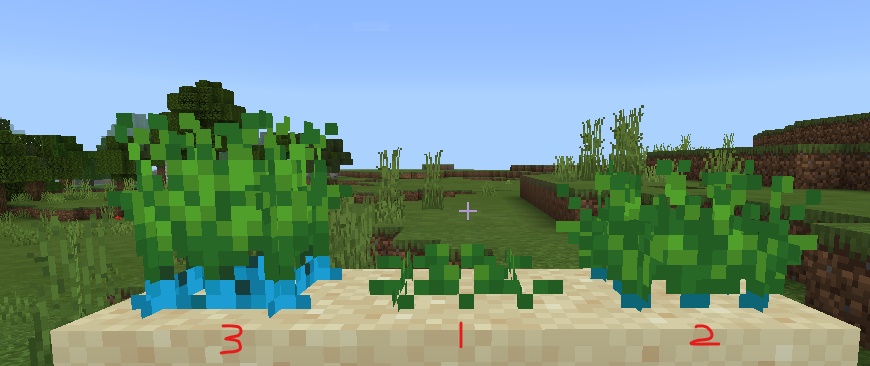
其中中间为阶段一(customcrop:customcrop_stage0),最右边为阶段二(customcrop:customcrop_stage1),左边为阶段三(customcrop:customcrop_stage2)。
# 自定义农作物方式二
该方式适用于配置json+python脚本控制。
这种方式包括一个物品(自定义物品)与三种自定义农作物的状态(自定义方块)。
这种方式需要配置netease:random_tick和netease:block_entity,使得 BlockRandomTickServerEvent事件 发送到脚本层并且支持自定义方块实体,从而实现方块转换的控制以及方块状态的存档。
# 1)自定义物品
在示例mod中,该自定义物品为customcrop:custom_item,在该物品的使用时,通过监听事件 ServerItemUseOnEvent 来判断是否可以在当前位置种植该物品(类似customcrop:custom_wheat_seeds的minecraft:seed中的plant_at功能),并且通过 SetBlockNew 设置农作物阶段一(customcrop:customcrop_1_stage0)。
# 2)自定义三种农作物状态
# customcrop:customcrop_1_stage0
{
  "format_version": "1.10.0",
  "minecraft:block": {
   "description": {
     "identifier": "customcrop:customcrop_1_stage0"
   },
   "components": {
      ...
      "netease:random_tick": { # 该方块会触发BlockRandomTickServerEvent事件
        "enable": true,
        "tick_to_script": true
      },
      "netease:redstone_property": {
        "value": "break_on_push"
      },
      "netease:neighborchanged_sendto_script": {# 该方块会触发BlockNeighborChangedServerEvent事件
        "value": true
      },
      "netease:block_entity": { # 方块实体数据存储
        "tick": false,
        "movable": true
      }
    }
  }
}
# customcrop:customcrop_1_stage1
{
  "format_version": "1.10.0",
  "minecraft:block": {
   "description": {
     "identifier": "customcrop:customcrop_1_stage1"
    },
    "components": {
      ...
      "netease:random_tick": {
        "enable": true,
        "tick_to_script": true
      },
      "netease:redstone_property": {
        "value": "break_on_push"
      },
      "netease:neighborchanged_sendto_script": {
        "value": true
      },
      "netease:block_entity": {
        "tick": false,
        "movable": true
      }
    }
  }
}
# customcrop:customcrop_1_stage2
{
  "format_version": "1.10.0",
  "minecraft:block": {
   "description": {
     "identifier": "customcrop:customcrop_1_stage2"
    },
    "components": {
     ...
      "netease:neighborchanged_sendto_script": {
        "value": true
      },
      "netease:block_entity": {
        "tick": false,
        "movable": true
      }
    }
  }
}
# 3)生长过程

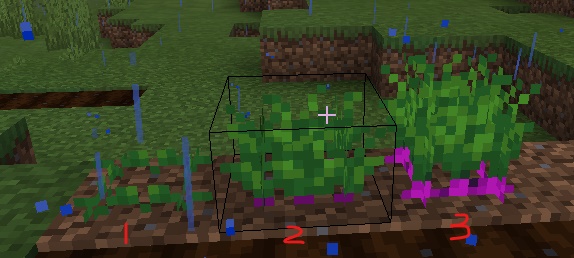
其中左边为阶段一(customcrop:customcrop_1_stage0),中间为阶段二(customcrop:customcrop_1_stage2),右边为阶段三(customcrop:customcrop_1_stage2)。
# 4)脚本简要说明
# 物品使用条件限定
在自定义物品customcrop:custom_item使用生成农作物第一阶段方块(customcrop:customcrop_1_stage0)时,可以通过监听事件 ServerItemUseOnEvent 来限制,例如:
def OnServerItemUseOnEvent(self, args):
    if args["itemName"] == "customcrop:custom_item":
        # 使用自定义物品时生成自定义方块
        comp = self.CreateComponent(self.playerId, "Minecraft", "blockInfo")
        belowPos = (args["x"], args["y"], args["z"]) # below
        blockDict = comp.GetBlockNew(belowPos)
        if blockDict["name"] == "minecraft:dirt": # 底下为泥土才能种植,这里同种子的plant_at判断
            blockDict = {
                'name': 'customcrop:customcrop_1_stage0',
                'aux': 0
            }
            comp.SetBlockNew((args["x"], args["y"] + 1, args["z"]), blockDict)
# 农作物转换条件
在示例mod中,我们通过监听事件 BlockRandomTickServerEvent 来判断是否可以转换到下一个阶段的自定义农作物,判断条件不限定于netease:transform中描述的光照、tick数量以及周边环境。同时,我们还可以借助blockEntityData组件来存储数据。
def OnStage0BlockTick(self, args):
    pos = (args["posX"], args["posY"], args["posZ"])
    comp = self.CreateComponent(self.playerId, "Minecraft", "blockInfo")
    lightlevel = comp.GetBlockLightLevel(pos)
    if (15 >= lightlevel >= 0): # 光照条件判断
        dimension = args["dimensionId"]
        blockEntitycomp = self.CreateComponent(self.playerId, "Minecraft", "blockEntityData")
        blockEntityData = blockEntitycomp.GetBlockEntityData(dimension, pos)
        if not blockEntityData:
            return
        growth = blockEntityData["growth"]
        if not growth:
            growth = 0
            growth += 1
            # 使用blockEntity保存tick count数据
            blockEntityData["growth"] = growth

            if (growth >= 1): # tick数量条件判断
                comp = self.CreateComponent(self.playerId, "Minecraft", "blockInfo")
                blockDict = {
                    'name': 'customcrop:customcrop_1_stage1',
                    'aux': 0
                }
                comp.SetBlockNew(pos, blockDict) # 切换到农作物的下一个阶段
# 农作物收获
开发者可以根据需要,通过监听事件 DestroyBlockEvent 以及 SpawnItemToLevel 来实现农作物的掉落。
# 自定义农作物外观
可使用自定义方块模型配置农作物的外观。
demo的
resource/bbmodel下有demo中农作物的模型工程,demo中所有农作物都共用一个工程,只是贴图不一样。
# Q&A
1)什么时候需要把自定义方块base_block配置成custom_crop_block:
需要netease:transform组件驱动方块之间的转换时
2)如何限制农作物的种植条件?
使用“自定义农作物方式一“的方式可以通过种子的”plant_at“字段进行限制;
使用“自定义农作物方式二”的方式可以通过监听 ServerItemUseOnEvent 来限制种植时的条件。
3)自定义农作物下方的方块被破坏、被替换、被推动时如何检测?
监听 BlockNeighborChangedServerEvent 事件监听周围方块的变化,并做响应的处理。
入门
分钟


